The Scottish Pie: Or, Pea and Goat Cheese Quiche

**Update 3/13: Crust recipe is not gluten-free. Substitute store-bought g-free pie crust. Filling is g-free**

Quiche is the new Macbeth.

Every time I make a quiche, disaster inevitably follows. Or precedes. Or something. The first time I made a quiche, I burned olive oil in a non-stick skillet, and then for some reason put a hot metal spoon in my mouth and burned my tongue. The second time, the heavily-adapted recipe that I used made way too much filling which overflowed out of the pie pan. Thank goodness I had put my pie pan on top of a baking sheet. Still, scraping burned egg mixture off of a baking sheet is no fun. The third time, I decided to get up early to blind-bake my crust before class, and I dropped my glass pie pan. Actually it was my roommate’s glass pie pan, so that was even more special.
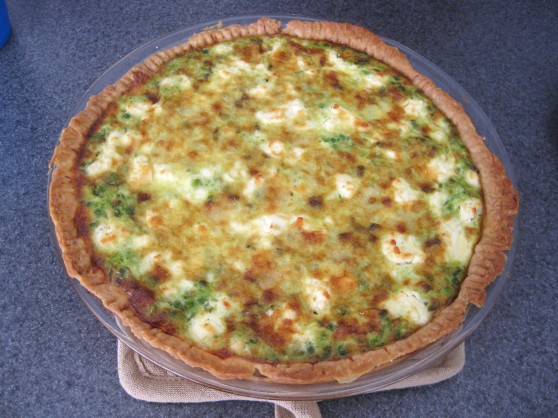

If the results weren’t always so delicious, I would probably give up on quiche altogether. So, to avoid future crises, I will no longer use the word “quiche” in my kitchen, and, as this blog is an extension of my kitchen, the word will disappear from usage here, too. Farewell, quiche. Hello egg-pie, egg-thingy, or The Scottish Pie.

This egg-thingy won “Grandma’s Favorite” at a recent pie contest. Though the results may have been skewed by the fact that this was the only savory dish in the competition, I’m still pretty proud of it. I first had a pea and goat cheese egg-thingy at an absolutely adorable tea room called Tea At The Gallery in Knoxville, Tennessee. This is a combination I would have never thought of on my own. I used to think of peas as boring, but this egg pie is anything but.

(God, this new terminology is going to take some getting used to.)

I will admit that this recipe is not perfect. Currently, the recipe yields one 9-inch egg pie and three crustless minis. I had a hard time finding a recipe that I liked, so I synthesized this recipe from many sources. Normally, I’d wait until I had the proportions exactly right before posting, but hey, ending up with extra egg pie is not such a bad problem to have. I’ve also included a super easy crust recipe that can work for any savory tart.

The Frakking Easiest Tart Crust in the Entire World (not gluten-free)
(from Food.com)
Makes 1 9-inch crust

1 cup flour
1/2 teaspoon salt
1/4 cup olive oil or 1/4 cup canola oil
1/4 cup refrigerated or ice water

1. Preheat the oven to 375 degrees. Mix flour and salt with fork. In a separate bowl, whisk together oil and water. Pour the oil and water mixture in to the dry mixture. Mix with fork until thickened.

2. Form crust into a ball, then roll out into a rough circle. No need to flour your cutting board or rolling pin – the olive oil keeps it from sticking. (You can try simply pressing the crust into the pan without rolling it out, but the crust is pretty elastic and hard to stretch out by hand.)

3. Press the dough into a 9-inch glass pie pan. Decorate the edge with your favorite scalloped or forked design.

4. Blind-bake the crust (meaning, bake the crust empty of any filling) for 10-15 minutes. Remove the crust from the oven when it is properly crusty instead of elastic, but before it starts to brown. Tip: Blind-baking ensures that the bottom of your crust finishes cooking. Be sure to protect the edges of the crust with a pie shield or foil. The crust also has a tendency to bubble, so you can use rice or beans to weight down the center. I simply poked holes in the bottom of the crust with a fork and it didn’t get too bubbly.

5. Do not drop your roommate’s glass pie pan. Allow crust to cool. You are now ready to add all manner of savory fillings!

Pea and Goat Cheese [Egg Pie]
(synthesized from Tasty Yummies, Peas.org, Emeril Lagasse, and my last [egg-pie] recipe)
Yields 1 9-inch egg pie and 3 crustless mini egg pies

1 Frakking Easy Tart Crust
2 1/2 cups frozen peas
2 eggs
2 egg yolks
1 1/4 cups half-and-half
2 tablespoons gluten-free dried chives
1 tablespoon gluten-free dried parsley
8 oz goat cheese, divided into 6 oz and 2 oz chunks
3/4 cup grated Gruyère cheese (optional)
Salt
Pepper

1. Preheat the oven to 375 degrees. Bring 2 cups of salted water to boil in a medium saucepan. Add 2 1/2 cups of frozen peas and cook for 3-4 minutes. Be careful not to overcook them. Drain peas and allow to cool.

2. Whisk together eggs, egg yolks, and half-and-half. Allow peas to cool and then purée 1 cup of peas in a food processor. Add pureed peas and 1 cup of whole peas to the egg mixture and beat together. Add chives and parsley; stir. (Yes, you should still have 1/2 cup of peas left over.These are for the mini quiches. Gravity makes all the peas end up in the larger crust if you don’t set some aside.)

3. Place your already prepared crust on top of a baking sheet. Pour the mixture into the already-prepared crust. Be careful not to overfill! You will have some egg mixture left over. Leave about 1/3 inch at the top. Then, crumble 6 oz of goat cheese and distribute evenly on top of the mixture. Sprinkle Gruyère over the top if using.

4. Protect the edges of the crust with a pie shield or aluminum foil. Cook the quiche for 35-45 minutes, until the goat cheese turns golden brown and the center is set.

5. Meanwhile, spray 3 cups of a muffin tin with non-stick cooking spray. Fill each halfway full. Divide 1/2 cup of peas between the three cups. Crumble the remaining 2 oz of goat cheese and add to each. Refrigerate until the 9-inch egg pie is done. Cook the minis at 375 degrees for 15-20 minutes, until the tops are golden brown and the centers are set.

6. Allow 9-inch egg pie to cool for about 30 minutes and serve while still warm. This can be refrigerated for up to 3 days. Minis can be frozen and kept in the freezer for several months. To reheat, place on a foil-covered baking sheet for 10-15 minutes.

May your Scottish Pie-making experience be disaster-free!

Up Next: Variations on a Theme: Couscous

The Lazy Gourmet: White Cheddar Grilled Cheese

**Update 3/13: Modified for gluten-free. Pictures are not of gluten-free items**

This post will be interspersed with some random flower and pumpkin pictures, because it is fall, and I like flowers and pumpkins. But this recipe has nothing to do with flowers. Or pumpkins.

Some days, when I am wading through the mire of midterms, melodrama, and stress-induced migraines, cooking seems impossible. Some days, I look at the word “skillet” in a recipe and forget what it means. Some days, I walk into my kitchen and the thought of julienne-ing zucchini or figuring out how to dice butternut squash without dying is excruciatingly painful.  Some days, I am too lazy to even type up the recipe for the Pea and Goat Cheese Quiche I made like two weeks ago now.

And on those days, my friends,  do we resort to ramen noodles? Do we get takeout from Subway? Do we unwrap a frozen meal and toss it in the microwave?

(Actually, sometimes we do the last one. Amy’s Vegetable Pot Pie is delicious. And organic. So I feel less guilty about it.)

Nay! Never! We are far too food savvy for that! Far too superior! Far too snobbish!

Instead of selling our souls to the fast food gods, we make grilled cheese.

Not just any grilled cheese, mind you. None of that bastardization called “American cheese.” This grilled cheese got class. Made from sharp white cheddar and Parmesan-encrusted slices of sourdough, this sandwich will have you licking your fingers in the happiest of ways.  How gourmet.

White Cheddar Grilled Cheese
Serves one lazy gourmet

2 slices of fresh gluten-free sourdough or white bread
Approximately 1 tablespoon butter
1-2 tablespoons Parmesan cheese, grated ( use fresh, not pre-shredded)
Dash of gluten-free herbs like herbes de provence, rosemary, or oregano

For the salad (optional):
A handful of spring mix
5-6 halved cherry tomatoes
Your favorite salad dressing (I used Garlic Expressions)

1. Heat a medium nonstick skillet over medium heat. Spread one side of each slice of bread liberally with butter. Then, sprinkle Parmesan cheese and smear it into the butter.

2. Place one slice in the skillet butter-side down. Add slices of white cheddar and sprinkle with herbs. Place the second slice on top, butter-side up. As the bread fries, press down on top of the sandwich with a spatula. After 1-2 minutes, when the cheese has started to melt and binds the two pieces of bread together, flip the sandwich. Continue pressing and flipping until both sides are crispy and golden brown.

3. Allow to cool and then slice in half. Assemble the salad, and enjoy.

Up Next: I said Pea and Goat Cheese would be next in the last post. I’m remaking it for a pie contest on Wednesday, so maybe that will motivate me to type up the recipe. Maybe.

Chocolate Chip Pudding Cookies

**Update 3/13: Not a gluten-free recipe**

These are the cookies that bewitch men’s souls.

Well. Okay. Not exactly. Though I’ve certainly tried to use them for that purpose.

What? Oversharing? Me? Never.


While they may not be entirely successful as tools of seduction, they are still damn good cookies. Chocolate pudding added to the batter makes them doubly, dare-I-say-devlishly delicious.


According to the original, this recipe yields ten dozen. I did not count exactly, but I did have to use my two cookies sheets several times each and in fairly rapid succession. Also, these can apparently be frozen for up to 8 months. I can’t have cookies in that close proximity to me for that long without eating them, so I have no idea if that’s true or not.

Chocolate Chip Pudding Cookies
(from…somewhere. Possibly Southern Living. I forgot to write down where it came from.)

1 cup butter or margarine, softened
3/4 cup firmly packed brown sugar
1/4 cup sugar
1 (3.9 oz) pkg. chocolate instant pudding mix (NOT the low fat kind. Get the legit stuff, people.)
2 large eggs
1 teaspoon vanilla extract
2 1/4 cups all-purpose flour
1 teaspoon baking soda
1 (12-ounce) package semisweet chocolate chips

You know, I find it annoying when recipes say “softened butter” so they don’t have to tell me how to go about softening it. Softening butter is tricky, at least for me. Sometimes if I attack it with some wax paper and a rolling pin,  I can get it to behave. Occasionally if I put it in the microwave for the exact right amount of time, it will soften without melting. But most of the time, I just have to leave it sitting out for a little while.

Commence actual recipe:

1. Preheat oven to 375 degrees. I’ve been cooking on my own for a month and I’m still forgetting to do this.

2. Beat butter at a medium speed with an electric mixer. When the butter is sufficiently creamy, gradually add sugars and pudding mix, beating well. Then, add the eggs and vanilla extract and continue to beat well. (That sounds so mean, doesn’t it?)

3. In a separate bowl, mix together flour and baking soda. Gradually add dry mix to the buttery chocolatey-ness. Beat that stuff up until all ingredients are well-combined.

3. Stir in even more chocolate in the form of chocolate chips.  You can also add pecans (1 cup) if you like.

4. Make itty-bitty teaspoonful-sized dollops of batter and place on ungreased cookie sheets. Bake at 375 for 8 minutes. Remove from oven and allow to cool on cookie sheets for 3 minutes. (Seriously. It’s important, as I’ve lived and learn). Transfer to wire racks to complete cooling.

5. Arrange cookies nicely on a platter, and then use them to seduce people. Or not. Cause honestly, that’s just kind of awkward.

Up Next: Adventures in Quiche-Making Part 2, now featuring even more klutziness than ever before!

Eggplant, Tomato, and Feta Bruschetta

**Update 3/13: This is not a g-free recipe. See note at the end**

Because I am not yet ready to share my ratatouille-making experience (read: I am too lazy to type it up right now), I’ll share what I did with my leftover eggplant instead.

Gosh I miss my brother’s fancy schmancy camera.

The bruschetta scene in the film Julie and Julia is yet another of the reasons I started to become obsessed with cooking and with Julia Child. Bruschetta is a fairly common Italian antipasto and usually consists of yummy bread laden with tomato and basil. Bruschetta (which hey, did you know it’s pronounced like brusketta instead of brushetta? I’ve been saying it wrong for years. Thanks, Ina Garten) is far more versatile than tomatoes, and I hope this variation is welcome.

Eggplant, Tomato, and Feta Bruchetta
(Or, the first recipe that I made up entirely on my own! Wahoo!)
Serves 1-2. Heck yes I would eat just this for lunch.

1/3-1/2 of one medium eggplant, cubed into roughly 1/3 inch pieces
2 tbsp olive oil + 1 tbsp olive oil for bread
Salt to taste
Dash of black pepper
1/2 cup grape or cherry tomatoes, halved
1/3 cup feta cheese
1 teaspoon white wine vinegar
1 teaspoon lemon juice
2 teaspoons minced garlic + 1-2 tsp for bread
Fresh basil to taste
3-5 slices of baguette or other hearty bread, 1/2-1 inches thick

1. Preheat oven to 425 degrees. Much like we did with Garlic Roasted Summer Squash, toss cubed eggplant with olive oil, salt, and pepper in a mixing bowl. Spread eggplant evenly over a large baking sheet lined with aluminum foil. Roast in oven for 15-20 minutes, until eggplant begins to brown. Check every five minutes to prevent burning.

2. While eggplant roasts, combine halved cherry tomatoes, feta, lemon juice, and white wine vinegar. When eggplant has finished roasting, remove from baking pan and allow to cool slightly.

3. Add eggplant to tomato and feta mixture and season with garlic and basil. Serve on top of thick slices of hearty, toasted bread brushed with olive oil and garlic. I have a bad habit of frying thick slices of bread with olive oil and butter whenever I make bruschetta. It’s not the usual way of making bruschetta bread, and it’s super delicious, but it will probably kill me one day.

Bon appétit, mes amis!

Note to g-free readers: I hesitate to recommend simply switching to g-free bread in this recipe. Most of the g-free bread I’ve had so far tastes just fine, but quickly becomes soggy when it comes into contact with oil or condiments are juices from meat. I’ve gotten into the habit of packing my condiments for sandwiches in separate tupperware and adding them to the sandwich right before I eating – if I didn’t, the bread would be inedible by lunchtime. You probably still can switch out g-free, but be sure to consume tout de suite. Your guests will have to add bruschetta to their bread slices themselves if you decide to serve this as an appetizer at a g-free dinner party. If you have any recommendations for heartier g-free bread, let me know!

Ravioli with Spicy Sage Butter

**Update 3/13: Recipe has been modified for gluten-free diet. Pictures are not of gluten-free items.**

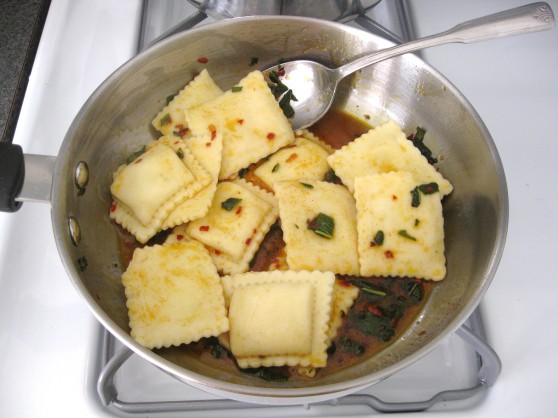
Though last week I posted about Zucchini and Goat Cheese “Crustless” Quiche, the following recipe was the actual first meal I made in my new kitchen:

Isn’t it such a lovely light-filled kitchen? The fridge is out of frame, and on the left we have two sets of French doors. Yesterday, the weather was so lovely that I cooked with the doors open. With Aretha Franklin playing in the background, the scene was idyllic. And then a bee flew in and I had to chase it away. Not the brightest idea I’ve ever had.

I’ve always adored ravioli, but in restaurants it tends to be drowned in sauce, so I hardly ever order it. This quick butter sauce adds the perfect amount of kick to 5-cheese or ricotta and spinach ravioli. Just a little drizzled over your ravioli, and you’ve got a dish drenched in flavor rather than in heavy tomato sauce. I’ve adapted this recipe from one of my favorite chefs, Giada di Laurentiis. (Is it sad that I can’t hear her name now without thinking of Pretty Little Liars?)

Ravioli with Spicy Sage Butter
(adapted from Giada di Laurentiis)
Serves 1-2

18 pieces gluten-free cheese or ricotta and spinach ravioli (Conte’s brand makes a g-free ravioli. If you’re in the ATX, you can find it at the HEB on 41st and Red River)
2 tablespoons butter
10-12 fresh sage leaves, chopped
1/2 tablespoon gluten-free red pepper flakes
1/4 tablespoon gluten-free paprika
1/4 cup pasta water
Parmesan for topping

1. Bring a medium saucepan of salted water to boil. Add ravioli, cooking for about five minutes. While ravioli cooks, melt butter in a small skillet. Once melted, add olive oil, sage, red pepper flakes, and paprika. Swirl together.

2. When ravioli is cooked through (all pieces float to the top), use a slotted spoon to transfer ravioli to skillet. Add 1/4 cup of pasta water. Toss ravioli with sauce until the butter begins to bubble and brown.

3. Spoon ravioli onto a plate. Drizzle with as much sauce as you like.

Modification when making a smaller serving: Prepare same amount of sauce, but only cook 9 pieces of ravioli. Leftover sauce can be refrigerated for 2-3 days.

I like to eat this dish along with a glass of milk because of my ridiculously low tolerance for spice.
Thanks for reading! Up next: Eggplant, Feta, and Tomato Bruschetta.

Zucchini and Goat Cheese “Crustless” Quiche

**Update: Recipe has been modified for gluten-free**

In this post, I will live up to the title of this blog.

The transition between 80-degree Knoxville summers and scorchingly hellish Austin has made me a little more klutzy than usual. In the airport security line I dropped my laptop battery on my shoeless foot. (My toe randomly dislocated on that foot this summer, too.) Apartment move-in left me significantly battered from dropping little things on myself, like tables. My friends tell me that my bruise-covered legs look like rotting potatoes now.

Lovely way to start a recipe entry, huh?

Among other addled things, I discovered that I left my camera cord in Knoxville. The one time I don’t make an insanely organized packing list…(Also, I no longer have my brother’s fancy camera to use, so picture quality will be somewhat diminished.)

But the wait is finally over! In the interlude I’ve been cooking up a tiny tempest, and thanks to my mommy, my camera cord has come back to me. My most recent kitchen accomplishment: Zucchini and Goat Cheese “Crustless” Quiche.

Things that were successful about this quiche:
-I successfully separated two eggs.
-I did not cut myself.
-The apartment did not burn down.
-The quiche was delicious.

Things that were not so successful about this quiche:
-I burned olive oil in a stainless steel skillet. After scrubbing vigorously with a mixture of baking soda and Dawn and then soaking over night, the once gloriously shiny skillet is still, well, brown.
-I also burned my tongue.
-Between scrubbing skillets and whatnot, prep time took about 40 minutes longer than it should have.

Hopefully, you have fewer mishaps than I did. Total time for this quiche is 2 hours and 20 minutes, but it is well worth the effort. Set aside a lazy Sunday afternoon for making this, and share the scrumptiousness with 6-8 people.

Zucchini and Goat Cheese “Crustless” Quiche
(adapted from Food Network Kitchens)

1 1/2 large zucchini and 1 large yellow summer squash
Salt
4 tablespoons olive oil
1 1/2 cups gluten-free breadcrumbs
1 medium white onion, chopped (about 1 cup)
2 tsp minced garlic (or 2 garlic cloves)
2 tablespoons parsley
2 tablespoons herbes de provence or rosemary/marjoram
1 tablespoon oregano
2 cups half-and-half
2 large eggs
2 egg yolks (I learned how to separate eggs from this very short video.)
Black pepper
6 ounces goat cheese (goat cheese logs usually come in either 8 oz or 4 oz pkgs.)
About 1/2 cup grated Gruyere or Swiss Cheese.

Note: I used a 9-inch glass pie pan, but an 11-inch tart pan would probably be more suitable and less likely to overflow.

1. Preheat oven to 350 degrees. (Because my oven is under my cooktop, I actually didn’t do this until after I’d finish sautéing the veggies)

2. Grate zucchini and/or squash on the large holes of a box grater. Or, if you are me who only has a little hand grater that is adorable but is really only useful for looking all schnazzy when you grate fresh Parmesan over your pasta, julienne your veggies. Chop your onion if you haven’t already.

3. Rinse zucchini shavings in a colander. Allow to drain for at least 15 minutes. Squeeze the shavings by the handful to get rid of some of the water. Set aside.

4. In a large skillet, heat 2 tablespoons olive oil over medium heat. DO NOT get distracted and let your olive oil burn. It ain’t pretty. Add bread crumbs and stir for about 5 minutes, or until the bread crumbs are evenly toasted. Evenly spread bread crumbs in a 9-inch glass pie pan. Or if you’re cool and you have a quiche/tart pan, use that. Place the pan on a baking sheet.

5. Wipe out the skillet. Add 2 more tablespoons olive oil, the onions, garlic, and salt to taste. Cook over medium-high heat, until the onions start to brown. (Food Network said that would take 5 minutes. It took more like 10 for me.) Add the zucchini, parsley, herbes de provence, and oregano. Stir just until zucchini gets limp. Remove  skillet from heat and allow mixture to cool.

5. In a small bowl, whisk yolks, eggs and half-and-half. Add salt and pepper to taste.

6. Add the zucchini mixture to the pie pan and spread evenly. Try not to fill past the top of the pan, and if you have extra zucchini, it’s yummy enough to eat all by itself. Crumble goat cheese over the vegetables in an even layer. Top with a sprinkling of Gruyere. Carefully pour the egg mixture over the top, starting in the center. Depending on what kind of pan you use, you may have a little bit of egg mixture left over.

7. Bake for 40-50 minutes, until top is golden brown and center is set. (Test with a fork – it should feel firm, not squishy.) Allow to cool before serving.

Up Next: Ravioli with Spicy Sage Butter. And, at some point, I’ll tell y’all how to use up those pesky leftover egg whites…

Happy 99th birthday, Julia Child

I thought about writing a gushing birthday message to dear departed Mrs. Child, where I was going to ramble excessively about how she changed the way Americans eat forever and how without her we wouldn’t have whisks and such. In the end, the best way to celebrate her truly extraordinary life is to watch the woman herself.

Happy birthday, wonderful lady. If I become even one percent of the cook that you are, I will feel accomplished. Bon appétit!

No recipe today. I don’t dare compete with the master.

Garlic-Roasted Summer Sqaush

**Update 3/13: This recipe was written before I went gluten-free but should be safe for those on a g-free diet**

Thanks, everyone, for the positive reactions to the first post! I seriously appreciate the encouragement.

It’s always annoyed me that having garlic breath is such a Big Deal. I was reading a Barefoot Contessa cookbook recently and in her instructions for planning a dinner party, she forbade having anything garlicky on the menu. Garlic is undeniably delicious, and if everyone stopped being so silly about the smell and ate more of it, it would cease being a Big Deal and we could all get on with our lives. Like how if people stopped whitening their teeth so much, everyone’s teeth would be regular-looking instead of bluish-white, and then people with perfectly normal shades of teeth wouldn’t have to feel guilty about choosing not to whiten because that whitening gel stuff tastes terrible if you get it on your tongue, and then your teeth get all sensitive,  which means you can’t eat sweets or anything cold, and what’s the point of having teeth in the first place if you can’t eat sweets?

Anyway.


The gods of summer bestowed plenty of yellow summer squash upon us this year. I haven’t always been a squash fan, but this super easy recipe has converted me. Garlic and herbes de provence enhance the natural yumminess of this bizarrely-shaped vegetable.

Fun fact: Herbes de provence is mix of herbs typically found in the Provence region of France. I used to think it was silly pretentious thing to buy, but now I swear by it. You can find herbes de provence at the grocery store, but if you don’t have it on hand, use a mixture of dried rosemary, thyme, marjoram, lavender, basil, oregano, and/or fennel seed.

Garlic-Roasted Summer Squash
(adapted from allrecipes.com)

3 small summer squash (2 if using medium-sized squash)
A little less than 1/4 cup olive oil
2-3 cloves garlic, minced
Herbes de provence, 1 tbsp or enough to coat the squash [gluten-free readers: if you are using a dry herb mix, be sure to use McCormick’s brand since they claim that their spices contain less than 20 ppm]
Dash of garlic powder*
salt and pepper to taste

1. Preheat oven to 450F

2. Trim the ends from the squash and alternate cutting across and lengthwise until you have about 8-16 slices from each squash, each roughly 2.5 inches long and 1 inch wide. In a bowl, toss the squash slices with olive oil and minced garlic.

3. Line a baking pan with aluminum foil and arrange the squash slices in the pan. Sprinkle liberally with herbes de provence. Add dashes of salt and pepper.

4. Roast in the oven until garlic and squash start to brown and the edges of the squash are crspy, about 10-15 minutes. Check the squash every 2-3 minutes to avoid burning.

5. Serve as a side dish for four, or eat alone with a slice of good bread; the olive oil and spices left over in the pan are too delicious not to be sopped up.

Wear your garlic breath proudly, folks. Enjoy.


It starts with a pie

**Update 3/13: This is not a g-free recipe. See note at the end**

Hello out there in blog-land! Welcome to The Kitchen Klutz! I’ve read that the most successful blogs have a schtick, so here’s mine: I’m a college student, who, like many others, is toying with the idea of culinary school after college, largely due to the influence of Top Chef. Though I label myself as cooking-obsessed, the honest truth is that I’ve done scant cooking on my own. I’m actually kind of a klutz in the kitchen. I’m frantic and frenzied and, if forced to cook more than one dish at a time, am usually near tears by the end. Grocery lists and meal-planning make me want to revert to ramen every night. When I move into my new apartment in a week, I will be cooking on an everyday basis for the very first time. I hope not only to become less of a klutz but to discover if my love for cooking is more than a pop culture-induced phase. On this blog, I’ll share the recipes I find and create along the way.

We’ll begin with a pie.Whoever said television rots your brain clearly never watched Pushing Daiseis. The Piemaker is my culinarified Mr. Darcy, Cheno and Cod will forever be my favorite detective duo, and Charlotte Charles is to blame for the impractical number of dresses in my closet. But I digress — I bring up Pushing Daisies because out of that show, my love for pie was born.

This pie is one of the few things I consistently make and consistently make well. The first time was two years ago, and as the first thing I ever baked on my own, it will always occupy a special corner of my heart. Since then I’ve taken it to parties and pot lucks, always with positive results. Though you’d never guess it from my lengthy instructions, this pie is really quite simple — ideal for beginning piemakers. To that end, I’ve included lots of little tips I wish I’d known the first time I made a pie.

I’d like to think the Piemaker would be proud.Ned’s Four Berry Pie
adapted from http://www.tvchitchat.net/5-doityourself-tvthemed-gifts/ of all places

Pies can be tricky little bastards. You can’t really taste them before you foist them on other people. I mean, you could. But then you would be gifting a partially eaten pie. The first time I made this pie with my friend Amanda, it looked more like a cobbler than anything else, so don’t be discouraged if that happens the first time. Or the second. Or the tenth. Berries vary both in sweetness and consistency, so blame Mother Nature.

For the Filling:
3 cups fresh blueberries
1 cup* fresh blackberries or boysenberries
1 cup fresh raspberries
1 cup fresh or frozen cranberries (if  you have difficultly finding cranberries, substitute you can’t find quartered strawberries)
1 tsp cinnamon
2.5 tbsp flour
2.5 tbsp cornstarch
1-2 cups sugar depending on the sweetness of the berries and your personal tastes
*1 cup of berries is roughly equal to one standard grocery store carton

For the Crust:
I’m told making crust from scratch is stressful, so for now, I use 2 Pillsbury “Unroll and Bake” Pie Crusts plus 1-2 tbsp butter.

1.  Preheat oven to 425°F. No seriously, do it now. 99% of the time I forget until I’ve already assembled the pie. Then I have to stand around for twenty minutes while the oven mocks me.

2. Wash berries and DRAIN. If you’re using quartered strawberries, draining is especially important. Overly damp berries make soupy pie. If you can stand waiting, place your colander on top of a medium-sized bowl (to catch the juice) and let the berries drain in the fridge for an hour or two.

3. While waiting for your berries to drain, follow the Pillsbury package instructions for defrosting the crust. Unroll one pie crust into a 9-inch (preferably glass) pie pan.

4.  Mix flour, cornstarch, sugar and cinnamon. In a separate bowl, gently mix the drained berries with about half of the dry ingredient mixture.

5. Place a layer of the remaining dry ingredients in the pie pan. Add a layer of berries, and alternate between berries and dry mix until all berries are used – usually 3 layers of berries, four layers of dry. You may have some dry ingredients left over. When you’re done layering, you should have a lovely, snow-covered mountain of berries. Don’t worry, the whiteness disappears as the pie cooks. Dot the top with butter.

6. Wet the rim of the crust with water. Drape the second pie crust over the top, firmly pressing the edges of the top and bottom crust together. Cut off any excess crust and discard. If you want to get fancy, you can lattice the top crust, but I usually opt for the simpler design pictured on the right– eight slits cut it in the top, with a forked edge. Brush top of crust with butter to create that flaky, homemade look.

7. Be sure to protect the edges of the crust with either pie a shield or aluminum foil. I also like to set my pie on top of a baking sheet, so any unfortunate drippage ends up there instead of burned onto the bottom of the oven.

8. Watch the Pushing Daisies pilot while your pie bakes – approximately 40-45 minutes. Look not only for a golden brown crust, but juices boiling up through the slits in the crust.

9. While the pie cools, treat yourself to more Piemaker eye candy. When cooled completely, slice the pie and serve solo or with a scoop of vanilla ice cream.  Leftover pie can be covered with foil and left out at room temperature for about two days. I’m paranoid about ants, though, so I usually store it in the fridge.

Serves 8 pie lovers.

Thanks for reading! Also thanks to my brother Nathan for letting me use his awesome camera, my lovely roommate Allyson for proofreading, Lizzie for saving me from an unfortunate blog title, and at The First Kitchen for inspiring me with her pie post.

Up next – Garlic-Roasted Summer Squash.

Note 3/13 for G-free readers: I’ve seen g-free pie crust at the store but haven’t tested it myself yet. Also, I suspect that the gluten-free all purpose flour can be substituted for the wheat flour, but again, I haven’t had a chance to test it myself. If you decide to attempt this recipe before I do, be sure to buy a g-free brand of cornstarch. Recommendations for converting this pie to g-free? Let me know!